I’ve heard a lot about Cloud services. Things like infinite capacity, flexibility, unlimited system and data resources. Those stand for “professional” clouds, the ones used by businesses and companies around the world. When it comes to private Cloud services, we hear that all of our pictures, videos and music can be reached from anywhere, from any device that has internet access. This sounds cool, doesn’t it?
So I’ve decided to check it out myself and see how the cloud works, how easy it is for anyone to create his own Cloud with a website in it for example, or any other user service. The choice of what you will use it for is up to you.
Let’s try creating an Amazon Elastic Compute Cloud (EC2) server. You will have to register an Amazon account for this and even if you do already have an account that’s used for Amazon purchases, confirmation of your email and personal data is required.
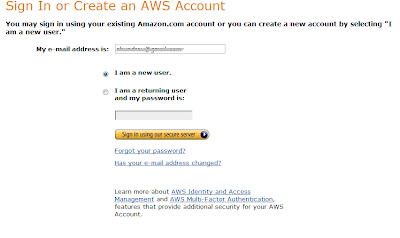
Registration is simple and there is nothing special about it except that you must provide a valid payment method in order for your account to be activated later, although Amazon has great terms for newcomers and all of its services are free for 12 months since registration date.
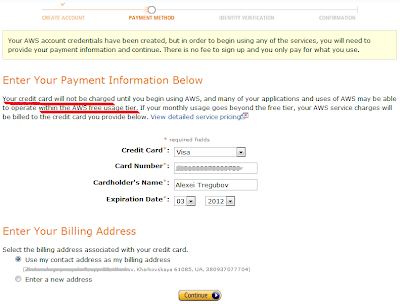
Registration is simple and there is nothing special about it except that you must provide a valid payment method in order for your account to be activated later, although Amazon has great terms for newcomers and all of its services are free for 12 months since registration date.
I live in Ukraine, and Amazon asks for your phone number in order to verify you are human. Cool thing about it is that you will actually receive a call from United States and will have to type a four digit number using your phone’s dial pad to make a confirmation. If it can be done from Ukraine, I bet you can do it from any country worldwide.


Once you complete the registration process and receive an email, confirming that your payment method is valid, you can start setting up your services right away from the Amazon Web Services (AWS) Management Console.
 AWS Management Console is like an admin panel, where you can view all of the information associated with your Cloud.

By the way, Amazon has some great Getting Started guides that allow you to get running in no time even if you are not familiar with specific terminology used in Cloud Services. This documentation can be accessed from the same AWS Management Console I was talking about earlier.
So, to start running you must first set up your own virtual server, which is referred to as an Amazon EC2 instance. Considering the fact that we are using the so called Amazon Free Usage Tier, you can only launch a micro Amazon EC2 instance. Micro instances provide a small amount of consistent CPU resources and allow you to burst CPU capacity when additional cycles are available. They are well suited for lower throughput applications and web sites that consume significant compute cycles periodically.
For requesting an instance you have to click on the corresponding button in Management Console and follow the appeared wizard instructions. First step is choosing the Amazon Machine Image or AMI. An AMI contains all the information that AWS needs to create the instance. You can choose from either Linux-based AMIs or Windows, whatever is more comfortable for you. Here is the illustration of how the Getting Started and Instance Launch buttons look:
Next image shows the Wizard window that is launched once you click the button. To keep things simple, AWS marks the AMIs that are available in the free tier with a star.

On the next post I’m going to start by choosing a Windows Server 2008 R2 Base AMI and see where this goes.
Комментариев нет:
Отправить комментарий